I enjoy crafting. I'm still fairly new to it, but I thought I would start this blog to share with you the projects I create. Have fun!
Thursday, February 4, 2016
Beard Oils & Beard Balms
I know this isn't the typical crafting post I use to do. However, both of my brothers have decided to grow beards and they love my essential collection. Over the Fall/Autumn of 2015, I made a few recipes, but here is one I created for them. The oils were mixed with beeswax and jojoba oil to create the beard balm in the tin. It's solid while cool, but softens when rubbed between the fingers before applying to the beard. My brothers seem to like the scent and say heir beards are softer than when not using anything at all.
Have you ever made a beard old or beard balm? Did you make them for a specific person or just in general for sale?
Have a great day, and....
Craft On.
It's been a while....
Forgive me. Life has got the better of me and I've had to put any and all blogging aside. I haven't stopped crafting, but I had to take a hiatus. We've had a family member fight and lose his battle with cancer. My house has seen many colds, especially between my youngest monkey and myself, we were both sick off and on for almost 4 months straight since October, 2015. My inlaws have moved to a house within 2 miles from me and I've been over there taking care of several minor and major issues, like plumbing issues and mailbox flying through the air thanks to the winds we get. Hopefully, if life doesn't throw me too many curveballs in a row, I'll get back to posting.
Craft On...
Craft On...
Sunday, March 2, 2014
My 1st ATC card
Here is the final product! I liked it So much, I am already working on a second one.
The phrase reads: "Learn to pause... or nothing worthwhile will catch up to you."
Happy Crafting...
Lisa
Thursday, February 13, 2014
Valentine's Day Treats
So, Valentine's Day is tomorrow. I personally don't celebrate this holiday, but my children do at their school. With that said, I wanted to share the little projects I worked on to help them celebrate with their friends.
This first picture is the treats my Freshman daughter will give to her close friends and my boys will give to their teachers. I can't take credit for this project's originality, someone else posted a pic similar on their Fb wall and my DH sent me the link, for all I know it's on Pinterest. I liked it so much, I felt the need to replicate as best as I could. For this project I used: red construction paper (cut down to 4.5" x 4"), ATG 714 glue gun, ROLO candies, black card stock cut into strips of 1/8" and tapered at one end, black curling ribbon (I didn't measure the length), Stampin' Up die for the tag (sorry, I forgot the name/number). I ran glue along the 4" ends as close to the edge as possible and I added 1/2 a strip of glue about 1/2" in from one end to stick the black "fuse" on. Line up the ROLO candy to the edge of the paper and roll, make sure you get the fuse in there before closing the dynamite all the way. For the teachers, I ran the ATG along the side of one ROLO and stuck the 2 sticks together, then I ran the black ribbon through a punched hole on the die cut and wrapped the ribbon around several times. Knot the ribbon and curl the ends. BAM! Instructions for the singles are similar, minus gluing to the other "stick". Surprisingly, my older kids thought these were really cool. *Yay! A pat on the back for mom!*
xoxoxoxo
Lisa
This first picture is the treats my Freshman daughter will give to her close friends and my boys will give to their teachers. I can't take credit for this project's originality, someone else posted a pic similar on their Fb wall and my DH sent me the link, for all I know it's on Pinterest. I liked it so much, I felt the need to replicate as best as I could. For this project I used: red construction paper (cut down to 4.5" x 4"), ATG 714 glue gun, ROLO candies, black card stock cut into strips of 1/8" and tapered at one end, black curling ribbon (I didn't measure the length), Stampin' Up die for the tag (sorry, I forgot the name/number). I ran glue along the 4" ends as close to the edge as possible and I added 1/2 a strip of glue about 1/2" in from one end to stick the black "fuse" on. Line up the ROLO candy to the edge of the paper and roll, make sure you get the fuse in there before closing the dynamite all the way. For the teachers, I ran the ATG along the side of one ROLO and stuck the 2 sticks together, then I ran the black ribbon through a punched hole on the die cut and wrapped the ribbon around several times. Knot the ribbon and curl the ends. BAM! Instructions for the singles are similar, minus gluing to the other "stick". Surprisingly, my older kids thought these were really cool. *Yay! A pat on the back for mom!*
Below are tags I made for my 2nd grader's classmate treats. I used vellum paper (cut down to 3.75" x 2 1/8"). However, to make things easier, I used a (discontinued) Stampin' Up rolling stamp with flourishes with silver ink and decorated the vellum BEFORE cutting it down to size. Next, using black Craft Smart dye ink, I stamped the "to/from" over the front of the tag. I let this dry overnight to ensure it wouldn't smear. Using a heart shaped punch, I cut out as many hearts as I could from pink construction paper and used the ATG to attach to the front of the tag. My son filled in the to/from parts and the tags will be stapled to fruit snacks.
For these treats below, I used the same decorated vellum pieces and pink hearts, but since the Kindergarten kids only need to have the "from" name on the tag, I swapped the stamp out for this "For You" stamp I had on hand. I wrote my little one's name on the pin heart, then ran the ATG across the name and adhered the heart to the back side of the vellum tag, to give it a different look. I also used Real Red ink pad from Stampin' Up for the stamped image. These tags were stapled to the front.
I hope you enjoyed this entry. I enjoyed getting back into my craft room, it's been quite a while.
If you happen to celebrate Valentine's Day, I hope it's a great one for you. If you don't, have a great day nonetheless.
xoxoxoxo
Lisa
Monday, February 10, 2014
Valentine's Cards for a group home
So a friend here in my community wanted to do something nice for others with her children. They decided to donated cards & treats to a local elderly group home knowing a lot of them have been ignored or forgotten by their family members. This breaks my heart. She asked us friends if we'd like to help donate, she needed about 155 cards/treats, so I said yes. I used a card making kit I bought on clearance at Michaels about 3 or so years ago and never opened. Until today. I only used the die cut pieces from the one kit (only 2 pages worth of die cuts), my glue runner gun, pop dots, 1 sheet of 8.5x11" vellum paper, 3 sheets of card stock cut in half, a Stampin' Up roller stamp (flourish) and a lilac colored ink. I popped out all the dies, inked the edges, started grouping them together and originally created 4 cards. Once I figured out what color I wanted to use for the card base, I rearranged the dies to better fit each card and ended up adding a 5th card. I just glued everything into place and voila!
Friday, March 1, 2013
Button Farm Subscription-February Purchase
My last post was on the contents of my BFC shipment. Well, I finally took some time to work on it. I like how the shipment comes with detailed instructions, very helpful for someone like me who still needs to work on layering more. Seriously, I rarely do more than a single layer. Initially, I followed the instructions really well, mainly for the measurements and paper choices but as time went on, I wanted to make it my own. I wanted to add a little bit of "me" to the book. As each page progressed, I decided not to add the cut outs and die cuts when directed. I felt like adding all of those additional elements at the end, that way I can play with my options and add more, less or swap the items out for other pieces. Here, is the final project.

Pages 10 and 11
Front cover
Inside front cover and page 1
Pages 2 and 3
Pages 4 and 5
Pages 6 and 7
Pages 8 and 9

Pages 10 and 11
Pages 12 and 13
Pages 14 and 15
Page 16 and inside back cover
Nothing was done to the back cover exterior knowing that it would most likely get scratched up. I hope you like my version of The Button Farm Club's February Mini Album. (A quick note, I used Beacon 3 in 1 Advanced Craft Glue and my 3M ATG glue gun for the adhesive.)
Thanks for looking, I will be back with another project next month.
Saturday, February 23, 2013
Button Farm Club membership
So, at this year's Anaheim, CA Scrapbook Expo I ran into the Button Farm Club. I had abstained from signing on since it wasn't my usual cup of tea. However, this year, I wanted to step out of my box so I joined. Here is my first shipment.
I am really looking forward to building this mini album!
Have you been to an Expo lately? What did you buy? Join any clubs? Did you tell/ask your significant other?
I am really looking forward to building this mini album!
Have you been to an Expo lately? What did you buy? Join any clubs? Did you tell/ask your significant other?
Monday, November 5, 2012
Live Love Laugh
I saw these layered signs hanging on the rack in Hobby Lobby the last few times I've gone shopping. Each time, I've passed on buying them, this time I bit the bullet and bought them. I knew I wanted to do a black and white coloring on them and knew I had the perfect paper pad to use!
Using sheets from DCWV's "the Bella Armoire stack" I traced, cut, adhered (Scotch Quick Dry Adhesive), sanded and inked up each sign. I used StazOn black ink and Black Soot Distress Ink by Ranger to blacken the exterior and interior of all the letters as well as inking ip the edges of the paper for a cleaner finish. Afterwards, I took Tea Dye Distress Ink and inked up the edges for a more vintage effect. I don't know about you, but I truly love the way these came out! I even got thumbs up from the hubby and my older 2 kids. Not bad.
Sunday, October 14, 2012
ScrapBook Expo in Ontario, CA 10/12
It's that time of year again! Scrapbook Expo came to Ontario, CA! I had completely forgotten that it was coming... My daughter's Bday is a week away and our best friend is getting married too. I wasn't planning on going with the multitude of things needing to be done, but hubby convinced me. Here are pictures of everything I bought. There were plenty of booths to visit, some I didn't bother with because the lines were too long.
Enjoy!
(Sorry for the sideways pics, it's been so long since I last posted that I can't remember how to rotate them.)
This set of borders and shapes is from "Kiwi Lane Designs".
Enjoy!
(Sorry for the sideways pics, it's been so long since I last posted that I can't remember how to rotate them.)
This set of borders and shapes is from "Kiwi Lane Designs".
These items are from ScrapAce.
These trendy Washii tapes were purchased from Queen & Co.
These trendy tapes were bought from the Accent ScrapBooking booth.
These fun jewelry, glue and clear squares & rounds were purchased from Craft Fantastic.
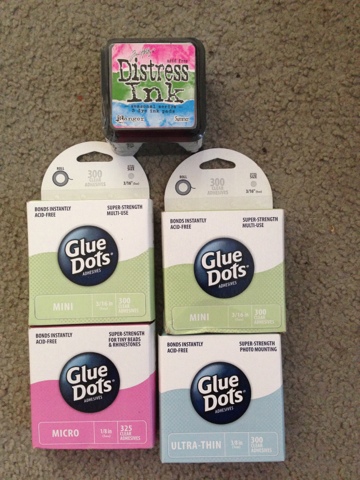
These Glue Dots and Distress pack were purchased from BEE Creative.
I spent a ton of $$$, but I'm excited to play with it all, especially the Kiwi Lane Design items!
Tuesday, March 6, 2012
Winner Announcement for "Our Favorite Things" Blog Hop
I wanted to announce that the winner of my blog candy is Cathy from "cathyplus5". I will be emailing her/you to get your mailing address and sending you the "Monster Chow" altered notebook. Congratulations Cathy!
Saturday, March 3, 2012
Our Favorite things
Welcome to the Our Favorite Things Blog Candy Extravaganza! You should have just come from
Dena's blog. If you are just joining the hop and want to start from the beginning, please start at Dena's blog
Dena.This is going to be an amazing event! Many of you are familiar with Oprah Winfrey's famous "Favorite Things" show where audience members walk away with an array of fabulous gifts. It was always so fun to see how excited the audience members got with each giveaway. Well, if you've always wished you could sit in the audience of one of those show tapings, we have the next best thing for you!
Each participant in this hop is going to share a favorite of hers. It could be a craft-related item or a non-craft related item. In addition to that, each blogger is giving away blog candy! This means you have a chance to win at every stop!
Each blogger has her own rules for winning her blog candy, so please be sure to read the rules on each blog for a chance to win.
Without further ado, here is the project I created for this hop:
I have become a "regular" in my kitchen. Sounds funny, but growing up, I had NO desire to cook. It always seemed like a CHORE, what a dirty word! LOL! Anyway...In the past 12 months, I have really become creative in the kitchen. So much so, I started my own little candy business. So, I thought, for this hop, I should make an altered notebook and turn it into a Recipe Book, something you can hand down to your kids or just compile a bunch of recipes (hand-written or clipped from newspapers or off the internet) and give to a friend. (Someone like a 1st time parent, newly single, college student, or even just your average friend who doesn't know how to cook other than from a box.)
Below are the majority of the items I used for this project. I added a couple after taking this picture.

Cut the printed sheet in half. Line up the edge of the paper to the outside edge of the notebook. Make sure to line up images so as to not cut off too many faces. Adhere. Repeat on back cover. Once you've got the cover sheets glued in place, THEN trim off the excess. (I learned this the hard way.) Decide how wide you want your spine cover to be and make sure it overlaps the printed paper slightly. Use your trimmer. (I can't give you measurements on this as it seems each notebooks varies ever so slightly. This one measured out to be 3.25" x 9.75". Ink up the edge of the spine cover. Mold the spine cover to the notebook itself, BEFORE adhering, this helps a lot! Apply glue to spine COVER and then carefully align to the spine of the notebook. Make sure to line up the edges of the paper (front and back) at both the top & bottom of the notebook, this makes it look more clean. Also, flatten the spine against your work-space to make sure that their are no unnecessary gaps.
Using the Cricut Expression, cut out your letters. I used the same plain card stock. However, since this was too close to the printed paper, I inked the letters in "Tea Dye" and "Black Soot". It was still a little too similar, so I adhered the letters to the vellum to give some contrast without taking away from the cute paper. To show where the vellum ended, I added the faux stitching lines with the Sepia pen. Adhere the vellum sheet to the notebook with mini glue dots. I placed one at each corner of the vellum and then placed more randomly behind the letters to help ensure it would stay. (I had already rounded the 2 corners by this point.) Ink up the edges of the notebook with "Tea Dye". The letters write out: "Monster Chow".
Each participant in this hop is going to share a favorite of hers. It could be a craft-related item or a non-craft related item. In addition to that, each blogger is giving away blog candy! This means you have a chance to win at every stop!
Each blogger has her own rules for winning her blog candy, so please be sure to read the rules on each blog for a chance to win.
Without further ado, here is the project I created for this hop:
I have become a "regular" in my kitchen. Sounds funny, but growing up, I had NO desire to cook. It always seemed like a CHORE, what a dirty word! LOL! Anyway...In the past 12 months, I have really become creative in the kitchen. So much so, I started my own little candy business. So, I thought, for this hop, I should make an altered notebook and turn it into a Recipe Book, something you can hand down to your kids or just compile a bunch of recipes (hand-written or clipped from newspapers or off the internet) and give to a friend. (Someone like a 1st time parent, newly single, college student, or even just your average friend who doesn't know how to cook other than from a box.)
Below are the majority of the items I used for this project. I added a couple after taking this picture.
- Standard notebook
- One 12 x 12" sheet of printed paper and a coordinating plain piece of cardstock. My sheets both came from DCWV's "Prints for the Year Ultimate Stack" that I found at Michael's on clearance.
- Tim Holtz's Distress ink pad in "Tea Dye" and "Black Soot", as well as the blending tool
- McGill's large tab punch (2 1/4" wide)
- ProvoCraft's "Happy Haunting's" cartridge using the Vampire font in 0.75"
- Sparkle Glitter pens by MultiCraft Imports to line each letter
- Martha Stewart writing pen in "Sepia"
- Scotch brand Scrapbooker's 2-way glue
- Mini glue dots (to apply the vellum)

Cut the printed sheet in half. Line up the edge of the paper to the outside edge of the notebook. Make sure to line up images so as to not cut off too many faces. Adhere. Repeat on back cover. Once you've got the cover sheets glued in place, THEN trim off the excess. (I learned this the hard way.) Decide how wide you want your spine cover to be and make sure it overlaps the printed paper slightly. Use your trimmer. (I can't give you measurements on this as it seems each notebooks varies ever so slightly. This one measured out to be 3.25" x 9.75". Ink up the edge of the spine cover. Mold the spine cover to the notebook itself, BEFORE adhering, this helps a lot! Apply glue to spine COVER and then carefully align to the spine of the notebook. Make sure to line up the edges of the paper (front and back) at both the top & bottom of the notebook, this makes it look more clean. Also, flatten the spine against your work-space to make sure that their are no unnecessary gaps.
Using the Cricut Expression, cut out your letters. I used the same plain card stock. However, since this was too close to the printed paper, I inked the letters in "Tea Dye" and "Black Soot". It was still a little too similar, so I adhered the letters to the vellum to give some contrast without taking away from the cute paper. To show where the vellum ended, I added the faux stitching lines with the Sepia pen. Adhere the vellum sheet to the notebook with mini glue dots. I placed one at each corner of the vellum and then placed more randomly behind the letters to help ensure it would stay. (I had already rounded the 2 corners by this point.) Ink up the edges of the notebook with "Tea Dye". The letters write out: "Monster Chow".
Using the gold sparkle glitter pen, I edged the letters and filled in the "drippings" to add that extra something. I also took random glitter gel pens on hand and colored in the eyes of the monsters. Using "Blush-R20" Copic marker I added cheeks to one monster and to the empty heart of another.
For my blog candy, the winner will receive this altered notebook. I have already cut 7 of the large tabs out for you to fill in and adhere where you want. To enter to win this fun notebook, please leave a comment below with a way to reach you (ie. email). I will choose a winner on Tuesday, March 6th. I will announce here on my blog the winner's name and I will also message the winner. I will then ship out this notebook to him/her.
Thank you so much for stopping by! I hope you enjoyed what I shared with you today. Please be sure to hop on over to
Ashley's blog (insert link to blog stop that follows yours on the hop) to see what she has to share with you and for more blog candy fun! Happy hopping and good luck to you!
Below is the entire blog hop lineup in case you lose your way:
Dena - http:// missdjones.blogspot.com/
Lisa L.- http://craftylam.blogspot.com
Ashley - http:// theglamoroussideofscrapping.blo gspot.com
Jennifer - http:// craftycardgallery.blogspot.com
Paula D. http:// scrapyourworld1.blogspot.com
Cely - http:// hawaiipaperparty.blogspot.com
Jamie - http:// scrapqueen141.blogspot.com/
Ellen - http:// cardmonkey-business.blogspot.co m/
Shannon -http:// my-o-scrappin.blogspot.com
Liz -http:// decadeofscrap.blogspot.com
Wendy -http:// gilbyscraftster.blogspot.com
Robin - http:// scrapandchat.blogspot.com
Ashley W.--http:// proudusmcwife415.blogspot.com
Saturday, February 11, 2012
Sexy Sirens Blog Hop
Welcome to Day One of the Sexy Sirens & Vixens Blog Hop! You should have arrived here from
Michelle's Blog . If you are just joining us and want to start from the beginning, please visit Dena's blog
Miss Dena's Blog . The complete blog hop lineup is listed at the bottom of this post.
We are a group of fifteen fun, sexy gals, most who met on Facebook with one common connection: our love of card making and other paper crafts! This weekend, the "Sexy Fifteen" will be sharing Valentine's Day projects using some of the sexier images from our awesome sponsor: Kenny K. Downloads!
http://www.kennykdownloads.com/
If you are not yet familiar with Kenny K. Downloads, what are you waiting for?! Kenny K. has the cutest digi's, from cute images suitable for kids to sultry images perfect for a card for your man! *WINK* Whether you want to try out one of their images for the first time or add to your existing collection, this could be your lucky weekend! Our sponsor, Kenny K. Downloads, will be awarding one commentor FIVE Kenny K. digi's of their choice ! Be sure to read the contest rules below!
Now, on to my project :


Thanks for stopping by. Your next hop lands you at Amber's Blog.
Thanks so much for stopping by. If you like what I did with "Bodacious Bev", please be sure to visit Kenny K. Downloads to purchase your own digi or check out what else they have in their extensive collection of digital images (some already pre-colored too!). Don't forget about the blog candy. To be eligible to win, you must, comment on each of the blogs in the hop.
You will get one entry per day if you comment on Day One's posts as well as Day Two's posts. Please note, that not all participants will have a second project up, but a lot will! You do not have to become a follower on each blog, but it sure would be nice if you did ! You MUST include an email address where you can be contacted should you win. The winner will be notified by February 20, 2012 via email. Winner must respond no later than 3 days after being notified. Otherwise, a second winner will be selected.
Thanks again, and be sure to hop on over to Amber's Blog to see what she has to share with you today! Below is the complete blog hop lineup:
1) Dena : http://missdjones.blogspot.com/
2) Lynne : http://slasewcraftiness.blogspot.com/
3) Ashley ; http://theglamoroussideofscrapping.blogspot.com
4) Zenita : http://www.scrappinwithz.blogspot.com
5) Gill : http://creationsbygillm.blogspot.com
6) Jamie : http://myamusinglife.blogspot.com
7) Jen : http://www.expressivelyme.blogspot.com
8) Jill: http://craftwithanangel.blogspot.com/
9) Sherry: http://patternsbysher.blogspot.com
10) Clare: http://cricutcraftyclare.blogspot.com/
11)Haidee: http://created2bunique.blogspot.com/
12)Michelle: http://craftychelle.blogspot.com
13) Lisa L: http://craftylam.blogspot.com
14) Amber J: http://pixiperfectcreations.blogspot.com/
We are a group of fifteen fun, sexy gals, most who met on Facebook with one common connection: our love of card making and other paper crafts! This weekend, the "Sexy Fifteen" will be sharing Valentine's Day projects using some of the sexier images from our awesome sponsor: Kenny K. Downloads!
http://www.kennykdownloads.com/
If you are not yet familiar with Kenny K. Downloads, what are you waiting for?! Kenny K. has the cutest digi's, from cute images suitable for kids to sultry images perfect for a card for your man! *WINK* Whether you want to try out one of their images for the first time or add to your existing collection, this could be your lucky weekend! Our sponsor, Kenny K. Downloads, will be awarding one commentor FIVE Kenny K. digi's of their choice ! Be sure to read the contest rules below!
Now, on to my project :
Looks like the beginnings of any other project, right? This project has definitely taken me out of my comfort zone. Not, because of the digi I got to use, no, but because I had to color this image. I'm terrified, yes TERRIFIED of correctly coloring in images. Getting the hair just right, highlights, low-lights, shimmer effects. Skin coloring, shading, shadows...UGH! SCARY stuff! I wanted to use Copic Sketch markers, but I only had 3=not enough to work on an image like this. So, I resorted to my colored pencils I also used the Stampin' Up pencils, not pictured here).
Here are the items I used for this project.
- Blue card stock and black card stock (the blue depends on your preference, I wanted mine to enhance my digi's eyes).
- Damask Decor, Opposites Attract and Art Philosophy cartridges
- Black bling
- Stickles: Stardust and Black Diamond as well as Distress in Fired Brick
- Water based blending pen
- Helmar's Scrap Dots
- Most importantly: Kenny K's digi image of "Bodacious Bev"

We printed up Bodacious Bev to be 9.5". Her hair was colored with: black, dark brown, red and burgundy. Using the water pen, I blended the hair coloring so the strokes are less visible. Stickles are added to add shimmer to her high lights. The skin is a bit harder, pink, orange, white and yellow were all used VERY lightly to get her this way. I added an extra stroke or 2 of pink along her decollete. Pink, fuschia and black were used to give her a smokey eye. Blue was used for her eyes, tear (tattoo) and her cross earring; Stardust Stickles was added to the "shine" in her eyes as well. Red on her lips, heart tattoo and nails. Red Stickles was added to her lips for a glossy effect. Pink Stickles are added to the beads of her corset and underneath is "Black Diamond" Stickles. The same pink Stickles was used to enhance the laces up those sexy thigh high boots. "Gunmetal" was added to the shiny parts of the boots. The boots were colored black, but the tongue is grey. The fuschia on the corset comes from the Stampin' Up pencil collection, whereas her leg is colored from the pencils pictured above.
The huge heart Bev is sitting on comes from the "Damask Decor" cartridge found on page 67, using the "layer 1" button. This was cut at 10.5" and placed at an angle. Black bling was placed on just the true round ends. I finally got to use my Scrap Dots for the first time. I applied the dots on the back of the heart and then let them dry for a while, then came back and added another level/layer before placing down on the blue background. I wanted that depth that pop dots can't really give. However, between Bev and the heart, I used the pop dots. For her bottom/extended boot, I used 3 pop dots piled on top of each other.
The "Opposites Attract" Cricut cartridge was used for the letters. They were cut at 1" with the exception of the "l" which was cut at 1.5".
This corner piece also comes from the AP cartridge found on page 58. Using the "font layer" key it was cut at 3.5" and also Stickled with the vlue color
The vines (3 in total) are cut from the "Art Philosophy" cartridge (my go to cartridge). It is found on page 59 of the handbook and were cut at: 2", 1.5" and 1", using the "font layer" key. The 1" was flipped so that I could create a heart shape with the swirls, pretty cute, huh??? The blue and pink Stickles were added for a little pop of color.
Here is a close-up of Bev's face and hair. My daughter says everytime she looks at this image, she gets drawn to Bev's eyes.
Here is a close-up of those sexy boots with the shiny pink lacing. (DH suggested the lacing feature.)
I really like the way "Bodacious Bev" turned out. I am "tempted" to get my hands on more images and get coloring. (pun intended)

Thanks for stopping by. Your next hop lands you at Amber's Blog.
Thanks so much for stopping by. If you like what I did with "Bodacious Bev", please be sure to visit Kenny K. Downloads to purchase your own digi or check out what else they have in their extensive collection of digital images (some already pre-colored too!). Don't forget about the blog candy. To be eligible to win, you must, comment on each of the blogs in the hop.
You will get one entry per day if you comment on Day One's posts as well as Day Two's posts. Please note, that not all participants will have a second project up, but a lot will! You do not have to become a follower on each blog, but it sure would be nice if you did ! You MUST include an email address where you can be contacted should you win. The winner will be notified by February 20, 2012 via email. Winner must respond no later than 3 days after being notified. Otherwise, a second winner will be selected.
Thanks again, and be sure to hop on over to Amber's Blog to see what she has to share with you today! Below is the complete blog hop lineup:
2) Lynne : http://slasewcraftiness.blogspot.com/
3) Ashley ; http://theglamoroussideofscrapping.blogspot.com
4) Zenita : http://www.scrappinwithz.blogspot.com
5) Gill : http://creationsbygillm.blogspot.com
6) Jamie : http://myamusinglife.blogspot.com
7) Jen : http://www.expressivelyme.blogspot.com
8) Jill: http://craftwithanangel.blogspot.com/
9) Sherry: http://patternsbysher.blogspot.com
10) Clare: http://cricutcraftyclare.blogspot.com/
11)Haidee: http://created2bunique.blogspot.com/
12)Michelle: http://craftychelle.blogspot.com
13) Lisa L: http://craftylam.blogspot.com
14) Amber J: http://pixiperfectcreations.blogspot.com/
15) Cely : http://hawaiipaperparty.blogspot.com/
Subscribe to:
Posts (Atom)