Saturday, January 21, 2012

Mac & Lightning McQueen

About a week ago, hubby and I headed out for our date night. As usual, nothing planned, just out to enjoy quiet time away from our 4 munchkins.  So, I asked if we could stop by Big Lots, I heard that they had some of the Cricut Cake cartridges as low as $15.  I did find one and I also found this "CARS" one for $25.  I felt compelled to buy.  Well, I had forgotten about it until yesterday, when my 5 year old picked it up ecstatically and yelled out "Lightning McQueen Mommy!!!"  He asked me if I could make him a "decoration".  Aww, how could I say no to that sweet request?  I opened up the packaging so he could better look at the box.  I figured he wanted McQueen, but alas, he chose Mack! My almost 4 year old chose McQueen, so of course I can't do 2 of the same, which would have been much easier to do.

Here is Mack, cut at 4" using most of the layers available.  I used a black pen to add accent to the grey pieces (grill and his upright exhaust pipe).  Instead of cutting out the "Rusteze" emblem for the hat, I just used "Goldenrod" Stickles where the Cricut lightly cut the hat at.  I also used "Platinum" Stickles on the backs of his mirrors, head lights and the splash guard.  "Silver" Stickles was used for the little mirror up by Mack's nose (the piece that was cut for this spot was lost).  "Black Diamond" Stickles was used to highlight the top of the exhaust pipe and the lug nuts of the front wheel.  "Xmas Red" Stickles was used (freehand) to color in his tongue.  Blue glitter glue from "studiog" was used for his eyes.


Lightning McQueen was cut at 3.25" using most of the available layers.  Stickles used: Golden Rod, Orange, Silver,Blue and Platinum.


Just for the record, I spent over 2 hours on these "decorations".  So, with all that effort and time invested in these 2, I decided to use my "YourStory" and laminate them so they last longer than 2 hours.  Well, the good news, they are still in one piece (each), however, the monkeys have already forgotten about them with 15 minutes of being handed them. *SIGH*

Saturday, January 14, 2012

DDs Crafts Fabulous Fifty Birthday Blog Hop Day 3

Welcome to Day 3 of DDs Fabulous Fifty Birthday Blog Hop.  If you landed here after visiting : Cheryl's Blog   then you're in the right place. If not, please go to DDsCrafts, to start from the beginning.  Today, I thought I would try to create something a little different, it's not a card and not a layout, but more of a display item to place on the table top (if you add a base stand) or on the wall.

Here are the items I used for today's project.

  • 2 Shades of pink card stock and one sheet of black card stock
  • A circle cutter, I used my Making Memories one, cut a circle at 7.5" out of the darker card stock
  • Glitter glue: I used 2 shades of pink from Studio g, found at Michael's and Gunmetal by Stickles
  • Cri-Kits Glitter pen in black as well as the pen holder/tool
  • ProvoCraft's Cricut Expression as well as the Elegant Edges and Rock Princess Cartridges
  • Sticky tape and pop dots


Using the Elegant Edges cartridge, refer to page 58 (circle 3). Press the "frame" button, set size to 5 1/4", P-Hi, S-Hi, B-6. Cut out of the black card stock and then set aside.  Using Rock Princess, refer to pages 32 and 37 for the numbers.  Press the "Heart Font" and cut the numbers out at 2.5" each, use the same settings as earlier.  Now, refer to pg 67. Cut (Butterfly2) at 2.25" out of the darker pink card stock. Then, press the "shadow" button and cut at same size out of the black card stock.  Next, press "shift" and cut in the lighter pink shade.  Assemble the butterfly, only attaching the body to the black shadow base. Use pop dots to attach the wings.  I forgot to show the Forever Young cartridge I used to write "fabulous".  Refer to pg 70 (flower7) and press the "word' button, you will "cut" at 1".  Insert the Cri-Kits pen holder and mini glitter pen in stead of the blade.  Make sure you drop the blade down about an inch into your circle so that there is enough space for the lettering.

Time to assemble! Pop dot the frame onto the pink circle, ensuring not to cover the sentiment. I chose to have the "fabulous" on top.  Adhere the 50 inside the frame against the pink circle.  Adhere the assembled butterfly to the pink circle, bend up the wings for that 3-D effect.  Stickle/glitter glue the butterfly, the 50's hearts, under each circle in the frame and the circles within the sentiment.

Next, take the a sheet of 8.5" x 11" black card stock and cut in 2" strips lengthwise.  Using your scoring board, score at (every) 3/4" and 1", so it you should be scoring at: 3/4, 1/ 1 3/4, 2, 2 3/4, 3, 3 3/4 and so on.Your last score will be at 10 3/4 for each strip.  Pleat fold.  Attach each pleat folded strip to the back side of your pink circle using sticky tape. NOTE: ensure that you are forming your strip to follow your circle's shape.    Once adhered, stickle a dot in the center of each pleat but onto the edge of the pink circle, all the way around except where the butterfly covers the edge.


Here is a close up of the gunmetaled hearts and the empty spaces of the sentiment.  You can see the stickles under each hole in the black frame.


Here is a close up of the 3-D butterfly stickled as well as the edge of the pink circle.


I hope you enjoyed this project.  Happy Birthday DD!

Your next stop is:   Shannon.  Happy hopping and thanks for viewing my project.

Friday, January 13, 2012

DDsCrafts Fabulous Fifty Birthday Blog Hop Day 2

If your hopping along with DDsCrafts Birthday Blog hop, you are on the right path, especially if you arrived from  Cheryl's blog.  If not and you would like to see all the projects for today, please start at  DD's Crafts site.  Below is my simple project for today.

Today, I decided to make a 4 x 4" card use some pink card stock.
Items used:
  • Pink card stock 
  • Black curling ribbon
  • Marvy tab punch
  • Close to My Heart "Celebrate" stamp from the Celebration kit
  • Sparkle Glitter pens
  • Stickles in: Silver and Thistle
  • "Black Soot" Distress Ink
  • "Zebra Print" Stamp by Stampabilities, purchased at Hobby Lobby
For the most part this card is very simple.  However, I cut a notch in the top right of the fold to accommodate the ribbon. For the sentiment, I placed it in the Marvy punch just far enough to accommodate the words/writing.  "Thistle" Stickles surround the sentiment and "Silver" Stickles edge the right side of the card.

Happy Hopping.

Your next stop is:  Shannon's blog

Thursday, January 12, 2012

DDsCrafts Fabulous Fifty Birthday Blog Hop

So, DDs Crafts is turning 50, what an awesome milestone!  We decided to join forces and put together this hop to help celebrate this wonderful lady.  If you just happened to land here, go back to:  DDs Crafts to start at the beginning.  If you've landed here after visiting  http://craftydeb-ddscrafts.blogspot.com/ Cheryl then you're on the right path.  Below is the layout I put together for this event.

Here are the items used for this project:

  • Sheet of 12"x12" paper from DCWV's "Bella Armoire Stack"
  • 8.5"x11" black card stock
  • Glittery sheets from DCWV's "the Mariposa  Matstack" and "the Glitter Matstack" 
  • Cricut cartridges needed- Rock Princess, Home Decor, Sentimentals, & Once upon a Princess


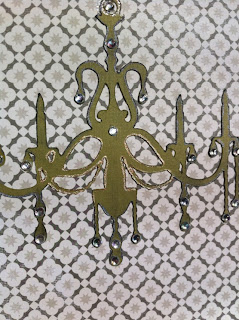
Using the Home Decor cartridge, tap the first button "chandelier", cut on card stock at 3.5". Speed-medium, pressure max and your blade set at 6 (this was cut out of some olive textured card stock I had left over from the "Christmas is for Kids" blog hop project).  Next, using the Sentimentals cartridge, cut out the desk found on page 42 of your handbook, at 4", speed-medium, pressure-max, and blade at 5. (I used ivory card stock from The Paper Company, 8.5"x11".)  Using left over olive card stock from the chandelier, I cut out the drawers for the desk, just use the "layer" key and the same settings from earlier. Also from the Sentimentals cartridge (using the ivory and olive card stocks), refer to page 29 in the handbook. Cut the Vanity Mirror frame at 4.5" after tapping the "layer" key, and the mirror backing at 4.5 using the "shadow" key.    Next, using "Rock Princess", go to page 56 of the handbook. Tap the "diamond" , "shift" and the "phrase" keys.  Cut the  "I wanna Rock" at 3", P-max, S-medium, Blade-5.

Once everything is cut, ink the edges using a blending tool. I used "Antique Linen" Distress Ink by Tim Holtz,  black ink pad and silver for the phrase.  Glue the vanity drawers on and the mirror pieces together.  Apply a section (preferably unwrinkled) of aluminum foil to the the backside of the phrase and to the mirror.  Adhere all the pieces to your background.

Grab your Cricut machine one more time. Can you tell I like, no LOVE my Expression?  Hahahaha!  Use the "Once Upon a Princess" cartridge, page 56 of the handbook, cut the "Diamond" (P-max, S-med, Blade 6), at varying sizes.  Use varying colored papers from the 2 matstacks from DCWV.  (I cut about 30 diamonds/gems.) Lay the gems out to your liking, adhere.  Bling up the chandelier with rhinestones.  Using the GellyRoll "Stardust Clear" glitter pen, trace the edges of the phrase, don't forget the interior edges.  At the last minute, I decided to add "For My Birthday" cut from the "Cursive 101" cartridge at 3/4".  Remember to trace the edges!

Here is the final project!


(Sorry about the lighting, I tried several times to really show the colors and glitter, this was the best I could get.)

Okay, that's it from me today (I know, it's a lot).  Jump on over to Shannon's blog to see what awesome project she came up with.

Happy Hopping!

Friday, January 6, 2012

Love Bugs Banner Hop

Participating in the Christmas Banner Hop felt so rewarding, we decided to do a Valentine's Day Banner using "Love Bugs" as our theme.  Adorable, right?  If you've come over from:  http://lindasimpsoncraftypieceofheaven.blogspot.com/ you're in the right place.  If not, and you want to start from the beginning head on over to: http://cardmonkey-business.blogspot.com/ to join in ALL the fun!

Here are the main supplies I used.  Ka-Zoo 12 x12 paper pad by K & Company. Create a Critter and DoodleCharms cartridges (most images were cut at 3.5", but 1-2 were cut at 3.75")

Here is the front of the banner in whole. Hard to see, but I wanted you to see how "fun" the colors were, not just lovey-dovey.

Here's a close up of the back side, the Critter/bug side.

Here are the rest of the critters/bugs.

I finally used my Gypsy to create this sentiment! I used Turquoise Stickles to really make the letters pop against the busy paper.  I also used black pen and added faux stitching around the letters/words.

Around the darker background papers, I added white faux stitching.  (Yes, I did accidentally adhere the "W" on the lion paper upside down. Arg!)

The Turquoise Stickles really helps the letters pop out on each piece.

Here are the last 3 letters. The banner spells out, "Have a sweet day".


Now, head on over to: http://crazyaboutcricut.blogspot.com/  .

And there's BLOG CANDY to be had!!  THANK YOU to our generous sponsors who have provided prizes to those who hop along. Here are our sponsors and their prizes:

Jellypark Digital Stamps will award 
2 free digi-images to the winner of this prize!
The winner of this prize will be selected 
via RANDOMdotORG from all the
comments received on Day #1.


K Andrews Designs (thank you, Kristal!) will donate
one fabulous stamp set to the winner of his prize!
The winner of this special prize will be presented
to the creator of the banner picked by the kids
at Pediatric Specialty Care as their favorite.


Robyn's Fetish Digital Designs will donate
FIVE (5!!!) digital images to the winner of this prize.
The winner of this prize will be chosen via
RANDOMdotORG from all the comments
posted on Day #2 (Saturday).

All hoppers are eligible to win.  Here's how: 

Follow the blog and comment on as many projects as you choose -- the more blogs where you comment and follow, the more chances you have to win. There's just one catch: please actually comment on the project, which shows you've looked at the project, not just cut/pasting random comments ("CUTE! TYFS") only to win the prize.