So, DDs Crafts is turning 50, what an awesome milestone! We decided to join forces and put together this hop to help celebrate this wonderful lady. If you just happened to land here, go back to: DDs Crafts to start at the beginning. If you've landed here after visiting http://craftydeb-ddscrafts.blogspot.com/ Cheryl then you're on the right path. Below is the layout I put together for this event.
Here are the items used for this project:
Here are the items used for this project:
- Sheet of 12"x12" paper from DCWV's "Bella Armoire Stack"
- 8.5"x11" black card stock
- Glittery sheets from DCWV's "the Mariposa Matstack" and "the Glitter Matstack"
- Cricut cartridges needed- Rock Princess, Home Decor, Sentimentals, & Once upon a Princess

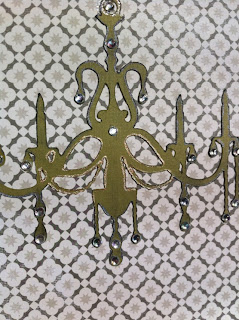
Using the Home Decor cartridge, tap the first button "chandelier", cut on card stock at 3.5". Speed-medium, pressure max and your blade set at 6 (this was cut out of some olive textured card stock I had left over from the "Christmas is for Kids" blog hop project). Next, using the Sentimentals cartridge, cut out the desk found on page 42 of your handbook, at 4", speed-medium, pressure-max, and blade at 5. (I used ivory card stock from The Paper Company, 8.5"x11".) Using left over olive card stock from the chandelier, I cut out the drawers for the desk, just use the "layer" key and the same settings from earlier. Also from the Sentimentals cartridge (using the ivory and olive card stocks), refer to page 29 in the handbook. Cut the Vanity Mirror frame at 4.5" after tapping the "layer" key, and the mirror backing at 4.5 using the "shadow" key. Next, using "Rock Princess", go to page 56 of the handbook. Tap the "diamond" , "shift" and the "phrase" keys. Cut the "I wanna Rock" at 3", P-max, S-medium, Blade-5.
Once everything is cut, ink the edges using a blending tool. I used "Antique Linen" Distress Ink by Tim Holtz, black ink pad and silver for the phrase. Glue the vanity drawers on and the mirror pieces together. Apply a section (preferably unwrinkled) of aluminum foil to the the backside of the phrase and to the mirror. Adhere all the pieces to your background.
Grab your Cricut machine one more time. Can you tell I like, no LOVE my Expression? Hahahaha! Use the "Once Upon a Princess" cartridge, page 56 of the handbook, cut the "Diamond" (P-max, S-med, Blade 6), at varying sizes. Use varying colored papers from the 2 matstacks from DCWV. (I cut about 30 diamonds/gems.) Lay the gems out to your liking, adhere. Bling up the chandelier with rhinestones. Using the GellyRoll "Stardust Clear" glitter pen, trace the edges of the phrase, don't forget the interior edges. At the last minute, I decided to add "For My Birthday" cut from the "Cursive 101" cartridge at 3/4". Remember to trace the edges!
Here is the final project!


(Sorry about the lighting, I tried several times to really show the colors and glitter, this was the best I could get.)
Okay, that's it from me today (I know, it's a lot). Jump on over to Shannon's blog to see what awesome project she came up with.
Happy Hopping!
Just a totally cool Layout. TFS.
ReplyDeleteKathi
kat0762@yahoo.com
Great layout!
ReplyDeleteBeautiful project .... You used some of my favorite cartridges :)
ReplyDeletepruttybird at comcast dot net
You did a great job, so much detail and I love I wanna rock with all the diamond.
ReplyDeletejaniceaeschliman.blogspot.com
awesome project :)
ReplyDeleteThis is sooo BEAUTIFUL!AWESOME job!I LOVE all the great details:)
ReplyDeleteWonderful job!!
ReplyDeletecathyplus5.blogspot.com
What a fun way to celebrate!!
ReplyDeleteTFS!!!
Cathie
scraphappycat@gmail.com
Wow, you really spent some time doing this project!!! Love the details and sentiment. I am fairly new at this too! I am looking to get new friends over at my blog!!! I am your new follower, yeah!!!! Can't wait to see what you do next. I would love love love if you visit me!!!!
ReplyDeletewww.scrapbookingforbeginners-naomi.blogspot.com
OMG! AMAZING! Love the layout! Great job! New Follower.
ReplyDeletehttp://craftingwithcreativem.blogspot.com
This is great, love your work
ReplyDeletemeagain20002000@yahoo.com
Such a cute project!! TFS!!
ReplyDeleteHugs,
Leslie
so detailed in your write up. I LOVE IT when people really give us the dimensions to their projects. Fantastic job on the LO.
ReplyDeletepaula
www.faithful2god_2000@yahoo.com
www.scrapyourworld1.blogspot.com
such a great home decor project!
ReplyDeleteTFS
jessica
chick-n-scrap.blogspot.com
eschfamily@yahoo.com
REally love it! Beautiful inspiration.
ReplyDeletehttp://scrappyhappymommy.blogspot.com
Super cute card, she is going to enjoy them all, hugz...Kim
ReplyDeletekim.scrapper@yahoo.ca
Love your card. So many cute details. Thanks for sharing.
ReplyDeleteVicki
vwilson577 at yahoo.com
COOL! Terrific job on this. Great details and everything. Hugs- Glora
ReplyDeleteme(at)glorajean(dot)com
I love all the bling you used and the all the rocks you have all over and the sentiment is adorable. Thanks for sharing.
ReplyDeletehttp://racincrafts.blogspot.com/ or
racincrafts at aim dot com
Awesome layout and instructions! Lots of great detail:-)
ReplyDeletejejaeb at cfl dot rr dot com
scrappinana.blogspot.com
Wow, lots of detail using those cartriges and paper choices.
ReplyDeleteWhat an unusual card. All the work that went into it, has made it exceptional. Thanks for sharing.
ReplyDeleteThis is awesome! Thanks so much for sharing how you made it..that is always so helpful!
ReplyDeleteI love everything you did on your project. Thank You for telling us how you did it.
ReplyDeleteRachelle
joyfulhrt at gmail dot com
www.creationsbyrachelle.blogspot.com
Pretty awesome project. I love how you did with the color and the layout. Great design too!
ReplyDeleteemergency locksmith
Great project so much detail.
ReplyDeleteLinda
lmkindell1@verizon.net
lindashappyplace.blogspot.com
This is an awesome project. Love the diamonds and the colors and patterns. Nice being in the hop with you.
ReplyDeleteAshley
http://theglamoroussideofscrapping.blogspot.com
Checked back for day 2 will check again tomorrow!
ReplyDeletejaniceaeschliman.blogspot.com
Great idea. Thanks. marg0006@verizon.net Loving Scrapper101
ReplyDeletethis is really cute I just love all the colors you have used thanks so much for celebrating my 50 Birthday its been such a fun time here Hugs Debbie
ReplyDeletePretty!! Happy Birthday to Ms. Debbie!!!
ReplyDeleteWanda
Cute layout.
ReplyDeleteKathy
Katsews at gmail dotcom
REALLY BEAUTIFUL CARD...LOVE B/W THEME..
ReplyDeleteMICKEY